Note: This method does not work for Hotline Miami 2: Wrong Number.
Tools needed[]
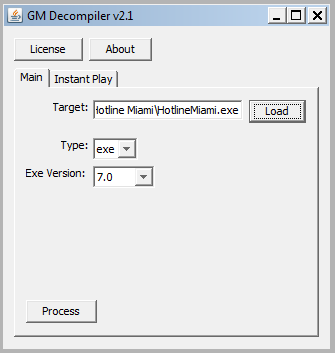
Decompiler loaded with Hotline Miami's executable
To decompile the game files you need GM Decompiler: Here is the download link
Click on LOAD in the right.
Select the Original Game .EXE (HotlineMiami_Original.exe)
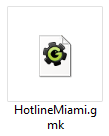
Wait a few minutes and a file called HotlineMiami.GMK will appear on your Hotline Miami folder.
Now Import this file to Game Maker 7 or 8.0/8.1
You can find this two versions of Game Maker from various sources.
Game Maker: Studio's standard version is free, but there will be a watermark at the start of the game, and because some of the functions that Hotline Miami uses were removed in GM:Studio, editing the code will be required to make the game work.
Hotline Miami's gmk file.
A port of the game to GM: Studio can be downloaded here.
The Pro and Master versions of GM:Studio costs from 90-560$.
When saving your edited version, press Ctrl+S and name it anything and place it in the original game folder.
Adding new weapons[]
To add new weapons to the game you need to create 4 sprites of the weapon:
• Walking [when the player is moving with the weapon]
• Attack/Shoot [when shooting/hitting with the weapon, gun or melee]
• Execution [killing a downed enemy with the weapon]
• Dropped [when the weapon is a pickup on the ground]
you need the sprites for the weapon. This is the following: sprPAttack____ sprPWalk____ sprEAttack____ sprEWalk____ sprESearch____ and lastly, the actual weapon image itself (this will go into the sprWeapons image, just look at all the other weapons in there for a reference for what kind of thing you want to draw). The index your new image holds in sprWeapons is extremely important. See that little number that says "image whatever" underneath the picture? Make sure you remember that number. This is the way's game of keeping track of what weapon is which, and that 'whatever' is how you'll be primarily working with weapons from now on. Every time you create a new image for a weapon, it'll automatically be added to the end, but make sure to move it to immediately after the last weapon added. For your first weapon, you want to put it after the silenced Uzi, which is image 25. Everything after that is considered by the game to be a 'throwing weapon', which is treated differently. For example, if I want to add an AK-47, I'd draw the sprite for it, and move it till it is image 26, and if I want a 9mm, for example, I'd move its image sprite to right after the AK, so that it's image 27. I'll talk about how to adjust for these later.
On a side note, if you want your weapon to be player-exclusive (ie, something like the drill or the silenced Uzi, you can skip all the enemy sprites. This saves significant time and effort, and allows you to work with 'special' weapons. However, it also restricts the weapons to your player character, so make sure that's what you absolutely intend in terms of gameplay and canon. It wouldn't make much sense if your character was the only one in the entire world who could properly wield a wooden 2x4, for example.
Anyhow, after you have all the sprites drawn, you want to actually 'initiate' the weapons. You want to find two particular objects: objWeapon
objSpecificWeapon
(if you're creating a throwing object, I haven't actually done this so the finer points may alter, but generally it's the same and you'd want to also go to objWeaponThrow) Open up the Create event for both of these, and you'll see an ammunition section. If your weapon is a gun, this is the place to input ammo, and the first place where you're going to have to use that image index. Continuing the example of the AK, I would add the line
if image_index=26 ammo=60
right below the ammo indicator for image_index=25, which would mean that if the game is calling the weapon associated with image 26 (the AK), the global ammo counter for that gun would be 60. Note that this is also for the objWeapon only, which are weapon spawns. The weapons which generate with enemies can have different ammo values, which I'll mention later.
The next thing you want to do is modify the scripts. The scripts to be modified are
- scrGetWeapon *scrCurrentWeapon *scrCurrentWeaponExt *scrScoreDraw (if gun) *scrStoryDrawAmmo (if gun) *scrScoreDrawStory (if gun) *scrPlayerShoot *scrIsWalking *scrIsSwinging (if melee) *scrIsSearching *scrGetAttack (if melee) *scrGetAmmo (if gun)
scrGetWeapon
Scroll to the bottom till you get to if image_index=25 objPlayer.sprite_index=sprPWalkSilencedUzi. Immediately after this line, enter a new line and type in the code for the new weapon. Adding the AK, I would input if image_index=26 objPlayer.sprite_index=sprPWalkAK Now, you want to modify the line that contains the throwing variables. Currently, in my game, I've added both the AK and a handgun, so my script looks like if image_index=25 objPlayer.sprite_index=sprPWalkSilencedUzi
if image_index=26 objPlayer.sprite_index=sprPWalkAK
if image_index=27 objPlayer.sprite_index=sprPWalkHandgun
if image_index>28 {objPlayer.sprite_index=sprPWalkThrow objPlayer.throwindex=image_index-28} Every time you add a new weapon, you have to increase that image_index>28 by 1. This allows the game to differentiate between throwing weapons and standard weapons. scrCurrentWeapon
Scroll all the way down till you find something that reads if objPlayer.sprite_index=sprPAttackThrow. As with before, that number ()+throwindex must be increased by one any time you add a new weapon. As for initializing your own weapons, you can pretty much insert the code anywhere you want, it won't matter. It should follow the format if objPlayer.sprite_index=sprPAttack(weapon) return (weapon index) So, the AK would look like if objPlayer.sprite_index=sprPAttackAK return 26 scrCurrentWeaponExt
This handles enemy attacks as well. Functionally, you can post any code anywhere and as long as it's correct the game will read it, but for organizational purposes, the code is divided into such:
player attacks waiter walking player walking enemy attacks enemy walking enemy searching special attacks (throwing, punching, and for some reason the trophy)
To each section, add the respective code. This is the example using the AK if argument0=sprPAttackAK return 26
if argument0=sprPWalkAK return 26
if argument0=sprEAttackAK return 26
if argument0=sprEWalkAK return 26
if argument0=sprESearchAK return 26 scrScoreDraw/scrScoreDrawStory/scrStoryDrawAmmo
These all handle ammo counts and are pretty much interchangeable. Scroll down until you see something like if objPlayer.sprite_index=sprPWalk() or objPlayer.sprite_index=sprPAttack() {
showammo=1
maxammo=whatever
} Replace the ()s with your weapon name, and give it whatever kind of ammo count you want. Then just copy that entire thing and copy-paste it to each of the three folders, right beneath the other ammo counters. For the AK, for example: if objPlayer.sprite_index=sprPWalkAK or objPlayer.sprite_index=sprPAttackAK {
showammo=1
maxammo=30
} scrPlayerShoot
This controls attacking, and is organized by weapons. I'll break it down between melee weapons and guns.
MELEE:
I'll use the knife as an example. The standard code for one weapon looks something like if sprite_index=sprPWalkKnife {
sound_play(choose(sndSwing1,sndSwing2))
sprite_index=sprPAttackKnife
image_speed=1
image_index=0
reload=6
global.usedmelee[3]=1
} The first line controls what weapon you want, so in this case, the knife. Whatever you want your weapon to be, change that first line to sprPWalk().
The second line chooses the sound which plays when you hit the attack button. It's relatively unimportant for melee weapons so I'm going to ignore it.
The third line initiates the attack sequence. Change it to sprPAttack().
The fourth and fifth lines respectively control how fast the image moves (with 1 being at 100%, or normal speed) and where the image starts playing from (the first index, 0). Don't change those.
The sixth line controls how long the animation lasts, and is the determinant of swing speed. Lower it to make the swing speed faster; raise to add some bulk to the swings. I recommend looking at the other swing speeds of weapons to get a grasp on what numbers approximate what swing speeds.
The seventh line determines if the game reads the new melee weapon in the script for achievements, and unless you have interest in your game registering for official Steam achievements, skip this.
GUNS:
Scroll down till you find a line that begins if ammo>0 { From here starts the guns section, and this first line tells the game that when there's an ammo counter displayed on screen, the weapon being held is a gun.
To add a gun, scroll down till you find the section handling one of the more unique guns (the MP5, Uzi, silenced Uzi, magnum, or Skorpion), and create a new space directly beneath it. You can realistically put it anywhere, but putting it in these places ensures you don't accidentally insert it in the brackets of another gun, which could seriously mess up the code.
For this example, I'm going to use the code from the handgun, since I'm actually having trouble finding where the brackets for the AK code are (karmic justice for piss poor formatting, to be fair): if sprite_index=sprPWalkHandgun {
sound_play(sndHandgun)
scrHearPlayer()
ammo-=1
reload=6
global.shake=5
if place_meeting(x+lengthdir_x(12,dir),y+lengthdir_y(12,dir),objSolid) or > place_meeting(x+lengthdir_x(12,dir),y+lengthdir_y(12,dir),objDoorV) {
my_id=instance_create(x,y,objSmokeHit)
my_id.image_angle=image_angle
global.dir=dir
with my_id {
move_contact_solid(global.dir,16)
}
} else {
my_id=instance_create(x+lengthdir_x(20,dir-7),y+lengthdir_y(20,dir-7),objBullet)
if instance_exists(my_id) {
my_id.direction=dir-5+random(10)
my_id.speed=16
my_id.image_angle=my_id.direction
}
}
my_id=instance_create(x+lengthdir_x(16,dir-7-4left),y+lengthdir_y(16,dir-7-4left),objShell)
my_id.sprite_index=sprUziShell
my_id.image_angle=dir
my_id.direction=dir-90*left-20+random(30)
my_id.speed=1+random(3)
sprite_index=sprPAttackHandgun
image_speed=1
image_index=0
light=12
global.usedgun[4]=1
} This seems like and probably is an utter clusterfuck of code, but basically breaks down into three parts: the main weapon stats, how the weapon reacts with doors, and shell casings.
Change the first line to sprPwalk(yourweaponhere). Then change the sound_play to whatever sound you want your gun to make when you shoot it. Ignore the next line (presumably it controls suppressed weapons, but I haven't worked with these yet and if you want to give it a try open up scrHearPlayer and mess around with it a bit).
ammo-=1 means that for each time you pull the trigger, that many rounds is subtracted from the overall ammo count. There's no reason to change this unless you for some reason want a single trigger pull to release multiple rounds (dual wield, perhaps?).
reload, as usual, controls how quickly rounds are dispensed. Increase this in order to make it semiautomatic, decrease this in order to make it automatic.
global.shake controls the weapon 'recoil', or in terms of Hotline Miami, how much the screen shakes when you fire the shot. Adjust this to your heart's ever-vibrating content.
Everything within the section containing objBullet controls how the bullets fly.
my_id.direction is the spread. my_id.speed is how fast the bullets fly. my_id.image_angle is pretty much the same as my_id.direction
Skip to the line which contains the objShell code. Change my_id.sprite_index=spr()Shell to accommodate the kind of weapon you're firing. If it's a handgun or submachine gun, it's sprUziShell. If it's a rifle of some sorts, it's sprM16Shell. If it's a shotgun, it's sprShotgunShell. Anything else, you'll have to draw a new sprite for, but it's more or less the same. So if you want a grenade casing, draw something like sprThumperShell and use that.
Then change sprPAttack() to whatever weapon you want.
light controls how bright muzzle flash is, or in terms of Hotline Miami, the radius of the flash which the gun adjusts. You can mess around with it but in my personal experience, it doesn't seem to affect much unless you change it to exorbitant amounts, which is pretty much epilepsy: the simulator as if the game itself weren't already seizure-inducing enough.
scrIsWalking
This controls walking behaviours. Simply insert a line of code anywhere in the format if argument0=sprPWalk(insertweapon)return true and you're good.
scrIsSwinging
This controls swinging of melee weapons. As with before, input anywhere within this code before return false something along the lines of if argument0=sprPAttack(whatever) return true and that's done.
scrIsSearching
If you've drawn searching sprites for your enemies, this is the place to put them in effect. As with the previous two, just insert something like if argument0=sprESearch(weapon) return true and you're done.
scrGetAttack
This controls enemy attacks, and is fairly straightforward to read. Copy-paste any line of code and change the weapon names to meet your new needs, for example: if argument0=sprEWalkHockeyStick or sprite_index=sprEWalkHockeyStick return sprEAttackHockeyStick scrGetAmmo
This controls the base value of bullets for each gun. This is how much each gun contains outside of the ammo you input into objWeapon and objSpecificWeapon, and will manifest in the form of how many bullets you want to give your enemies. These are all the 'roaming' guns which exist in the level, or otherwise, how much starting ammo each enemy gets. To add your gun, add something like if argument0=sprPWalkAK ammo=30 and you're good.